


Creative Designs for Your DIY Planter Box: 9 Unique Ideas.
Creating a DIY planter box for your garden is not just about growing plants; it’s also a great way to showcase your creativity. If you’re looking for innovative designs that can enhance your outdoor space while being easy to build, you’ve come to the right place. Here are nine unique ideas for your DIY planter box that are both functional and beautifully designed.
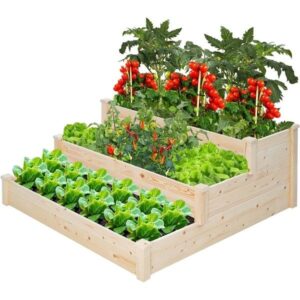
1. Tiered Planter Boxes
Tiered planter boxes offer a stunning vertical gardening option. These boxes can be made from wood or recycled materials and arranged in levels. This design is perfect for growing herbs, flowers, or even vegetables. You can easily customize the height and width to fit your garden’s aesthetics. Not only do they save space, but they also create a cascading effect that catches the eye.
2. Pallet Planter
Repurposing wooden pallets is an eco-friendly way to construct a stylish planter box. Simply stand the pallets upright and fill them with soil. You can plant flowers or small shrubs in the slats. This rustic look adds charm to any garden. If you’re looking for more inspiration on using pallets for gardening, check out Pallets 4 Life.
3. Stone Planter Box
For a more permanent and sturdy option, consider a stone planter box. Using bricks or natural stones, you can create a robust box that blends seamlessly into your garden. Stone planters are great for showcasing larger plants or small trees. This design adds elegance and durability to your outdoor space.
4. Vertical Wall Planters
Maximize your growing space with vertical wall planters. These attractive designs enable you to hang multiple planters on a wall or fence. You can create a pattern with various colors or sizes for a beautiful visual effect. Use felt pockets or wooden boxes to hold your plants. For ideas regarding vertical gardening, visit Vertical Gardeners.
5. Rustic Crate Planter
Old wooden crates can be transformed into charming planter boxes. Simply pull out the bottom slats, line with landscape fabric, and fill with soil. You can stack multiple crates to create height variations. This rustic look fits perfectly in farmhouse-themed gardens and lets you spotlight your favorite blooms.
6. Modern Geometric Planter
If you prefer a sleek, contemporary look, opt for a geometric planter box. You can use concrete or high-grade plywood and cut it into various shapes. Triangular, hexagonal, or cubic designs have a striking appearance and provide ample space for your plants. These planters can serve as artistic focal points in your garden.
7. Wine Barrel Planter
Transform a wine barrel into a stunning planter box for a touch of sophistication. Simply cut the barrel in half and fill it with soil. This design works well for larger plants and can be placed anywhere from patios to backyard gardens. The rustic charm of the wood adds character and warmth to your outdoor setting.
8. Hanging Planter Boxes
Hanging planter boxes are perfect for those with limited ground space. Using strong rope or chains, suspend planter boxes from your porch or balcony. You can sow trailing plants like ivy or petunias that spill over, creating a beautiful, cascading effect. This design adds a playful touch to your outdoor environment.
9. Raised Bed Planter Boxes
Raised bed planter boxes are not only practical but also stylish. They make gardening easier for those with mobility issues and can help control soil quality. Using wood or composite materials, you can easily create a rectangular or square box that suits your garden space. For more information on raised bed gardening, take a look at Raised Bed Gardening.
Building a DIY planter box can be a fun project that enhances your gardening experience. Whether you choose a tiered design, rustic crate, or modern geometric shape, each option allows you to express your personality while growing beautiful plants. Pick a design that resonates with your style and get started on creating your own unique garden oasis!

Essential Tools and Materials for Building Garden Planters
Creating a beautiful garden starts with the right tools and materials, especially when building your own planter boxes. With a bit of creativity and a few essential items, you can craft stunning garden planters that enhance your outdoor space.
Basic Tools for Building Garden Planters
When you embark on the journey of creating planter boxes, having the right tools can make the process smooth and enjoyable. Here’s a list of must-have tools you’ll need:
- Measuring Tape: This is essential for taking accurate measurements of your planter dimensions.
- Power Drill: A cordless drill will help you drive screws and create drainage holes swiftly.
- Saw: Whether you choose a circular saw or a hand saw, you’ll need it to cut wood pieces to size.
- Screwdriver: A reliable screwdriver helps secure joints and finish your planter box.
- Sandpaper: This is necessary for smoothing out rough edges and surfaces to prevent splinters.
Materials for Building Your Planters
The materials you choose will influence both the looks and durability of your garden planters. Below are some popular options:
- Wood: Cedar and redwood are excellent choices due to their natural resistance to rot. Alternatively, treated lumber is also suitable, but ensure it is safe for planting.
- Composite Material: If you prefer a more modern approach, garden planters made from composite materials offer durability and minimal maintenance.
- Landscape Fabric: This helps to separate soil from the wood, reducing moisture damage and prolonging the life of your planters.
- Wood Sealant or Paint: Using a non-toxic sealant or paint on your planters can protect them from the elements.
- Potting Soil: A high-quality soil mix is essential for providing nutrients to your plants. Choose a mix suitable for the type of plants you are growing.
Additional Items for Enhancing Your Planters
To elevate the functionality and aesthetic of your planters, consider the following items:
- Drainage Pebbles: Adding a layer of pebbles at the bottom of your planter can improve drainage and prevent water from pooling.
- Plant Markers: Keep track of what you’ve planted in each section with easily visible markers.
- Gardening Gloves: Protect your hands while handling soil and materials. Good gloves enhance the comfort and safety of building your planters.
Safety Precautions
While building your garden planters, it’s crucial to keep safety in mind to ensure a smooth and enjoyable experience. Here are some tips:
- Always wear safety goggles when using power tools to protect your eyes.
- Use a dust mask when sanding to avoid inhaling dust particles.
- Make sure your workspace is well-lit and organized to prevent accidents.
Where to Find the Right Supplies
Now that you know the tools and materials needed, finding the right supplies is the next step. Local hardware stores typically carry most of these items, but for convenience and broader selections, consider shopping online. Some great resources include:
- Home Depot – for a comprehensive selection of building materials and tools.
- Lowe’s – another great option for gardening and building supplies.
- Amazon – find a variety of specialized planter box kits and tools.
Building your own garden planters can be a rewarding project. With the right tools and materials, you’ll not only enhance your garden’s beauty but also enjoy the satisfaction of creating something unique. Happy gardening!
Step-by-Step Guide: How to Build a Simple and Stunning Planter Box
Building a DIY planter box is a delightful project that brings beauty to your garden while enhancing your gardening experience.
Creating your own planter box allows you to personalize your gardening space while ensuring access to quality materials.
Below is a step-by-step guide to building a simple and stunning planter box that will make your flowers and plants pop.
Materials You’ll Need
- Wooden boards (cedar or redwood are great options)
- Wood screws
- Wood glue
- Measuring tape
- Circular saw or handsaw
- Drill with drill bits
- Sandpaper (medium and fine grit)
- Wood stain or outdoor wood sealant (optional)
- Landscape fabric (optional)
Step-by-Step Instructions
Follow these detailed steps to create your planter box:
Step 1: Measure and Cut the Wood
First, decide on the dimensions of your planter box. A standard size is 4 feet long, 2 feet wide, and 1.5 feet deep. Use your measuring tape to mark and measure the wooden boards accordingly. You will need:
- Two pieces for the long sides (4 ft long each)
- Two pieces for the short sides (2 ft long each)
- One piece for the bottom (4 ft x 2 ft)
Once measured, carefully cut the boards using a circular saw or handsaw.
Step 2: Sand the Edges
After cutting, use sandpaper to smooth out any rough edges. This step prevents splinters and ensures your planter box looks polished. Use medium-grit paper first, followed by fine-grit for a smooth finish.
Step 3: Assemble the Box
Begin by laying the two long boards parallel to each other. Attach the short boards to each end using wood screws to create a rectangular frame. Pre-drilling the holes can help avoid cracking the wood. Once you have the frame, attach the bottom piece to the frame using wood glue and screws for additional stability.
Step 4: Drill Drainage Holes
To avoid water accumulation, drill a few drainage holes in the bottom of the planter. Space them evenly across the base to promote proper drainage.
Step 5: Optional Staining or Sealing
If you want your planter box to withstand the elements and add a decorative touch, consider staining or sealing the wood. Choose an outdoor wood stain or sealant and apply it according to the manufacturer’s instructions. Allow it to dry completely before moving on.
Step 6: Add Landscape Fabric (Optional)
Once the box is fully assembled and dry, consider placing landscape fabric at the bottom before adding soil. This prevents soil from washing out while still allowing for drainage.
Step 7: Fill with Soil and Plant
You can now fill your planter box with nutrient-rich potting soil. Choose the plants or flowers that you would like to grow and arrange them in your new box. Ensure each plant has enough space to grow.
Step 8: Place Your Planter Box
Decide on a sunny or shaded location suitable for your plants. Place your planter box in the desired spot and ensure it is level. Water your new plants according to their specific needs.
Customization Ideas
Your DIY planter box can also be customized according to your preferences:
- Paint or stain the wood in vibrant colors or natural tones.
- Add decorative trim or carving for a unique touch.
- Incorporate trellises for climbing plants.
Building a DIY planter box allows you to create a personalized space for your plants while enhancing your garden’s aesthetic.
This step-by-step guide makes it accessible and enjoyable.
If you’re looking for more advanced designs, check out Houzz for inspiration or visit Better Homes & Gardens for garden tips and ideas!
Choosing the Right Plants for Your DIY Planter Box
Creating a DIY planter box is an exciting project that enhances your garden or balcony while allowing for creativity and customization.
However, choosing the right plants for your planter box can make all the difference in the success and beauty of your gardening effort. Here’s a helpful guide to navigating your plant choices.
Consider Your Space and Climate
Before selecting plants, assess the space where your planter box will sit. Is it a sunny area, or does it get partial shade? The amount of sunlight your plants receive will significantly influence their growth. Here are some considerations:
- Full Sun: If your planter box gets at least 6-8 hours of direct sunlight, you can opt for sun-loving plants.
- Partial Sun/Shade: If your planter box is in a spot that gets some shade, look for plants that thrive in indirect sun.
- Humidity and Temperature: Consider your local climate. Some plants prefer warmer temperatures, while others may tolerate cooler climates.
Types of Plants to Consider
When choosing plants for your DIY planter box, think about the visual appeal and how plants will complement each other. Here are popular categories to consider:
1. Flowering Plants
Flowering plants add vibrant colors and scents to your garden. Some easy-to-grow varieties suitable for planter boxes include:
- Petunias: These annuals come in various colors and work well in full sun, adding a beautiful pop to your space.
- Marigolds: Great for pest deterrence and brightening any planter, they thrive in sunny spots.
- Pansies: These hardy flowers can handle cooler weather and provide blooms in early spring.
2. Foliage Plants
If you’re looking for greenery that remains throughout the seasons, consider foliage plants. They add texture and depth. Options include:
- Ferns: Ideal for shady spots, ferns bring lush greenery with minimal maintenance.
- Succulents: Perfect for sunny areas, these low-maintenance plants offer interesting shapes and colors.
- Heuchera (Coral Bells): Known for their stunning leaf colors, they work well in partial shade.
3. Herbs
Herbs are an excellent choice for a DIY planter box, especially if you enjoy cooking. Many herbs can thrive together and are perfect for small spaces. Some popular options include:
- Basil: This herb loves the sun and adds flavor to many dishes.
- Mint: Easy to grow, but be careful as it can spread quickly.
- Parsley: Thrives in both sun and partial shade, making it versatile for any setting.
Cohesive Plant Combinations
Mixing different types of plants can create a stunning display. Here are a few combination ideas:
- Flowering and Foliage: Combine colorful flowering plants like Petunias with lush foliage plants like ferns for contrast.
- Herbs and Edibles: Pair herbs with edible flowers, like nasturtiums, which not only look beautiful but also attract beneficial pollinators.
Maintenance Considerations
Keep in mind that different plants have various water and sunlight requirements. When planting, group plants with similar needs together to simplify care.
Regularly check for pests and ensure that your plants are thriving. Don’t forget to provide adequate drainage in your planter box to prevent root rot.
For detailed planting guides and additional tips, you can visit Gardening Know How and Better Homes & Gardens. These sites offer a wealth of gardening knowledge, including plant recommendations and care instructions.
Ultimately, the right plants can transform your DIY planter box into a vibrant oasis. By considering your space, climate, and preferences, you’ll be well on your way to creating a stunning green display that breathes life into your surroundings!
Maintenance Tips for Keeping Your Planter Box Thriving Throughout the Seasons
Keeping your planter box thriving throughout the seasons requires a bit of effort, but the results are incredibly rewarding.
Whether you’re growing flowers, herbs, or vegetables, a well-maintained planter ensures your plants flourish.
Here are some essential maintenance tips to help keep your planter boxes healthy and vibrant.
Monitor Soil Health
The foundation of a thriving planter box starts with healthy soil. Regularly check the soil moisture levels; overwatering can lead to root rot while underwatering can cause your plants to wilt.
Use your finger to test the moisture about an inch deep. If it feels dry, it’s time to water.
Fertilize Regularly
Plants in planter boxes often need extra nutrients since they’re confined to a smaller area compared to those in the ground.
Invest in a balanced fertilizer, and mix it into the soil according to the package instructions.
Types of Fertilizers:
- Granular Fertilizers: Easy to apply and lasts longer.
- Liquid Fertilizers: Quickly absorbed by plants, ideal for immediate needs.
- Organic Fertilizers: Improve soil structure and promote microbial life.
Prune Your Plants
To encourage growth and maintain shape, regularly prune your plants. Remove dead leaves and spent flowers to promote airflow and prevent diseases. Pruning also allows your plants to focus their energy on new growth.
Check for Pests and Diseases
Keep an eye out for signs of pests and diseases. Early detection is crucial. Look for discoloration, unusual spots, or webbing.
If you spot any issues, take appropriate action immediately, which could include using insecticidal soap or removing affected leaves.
Winter Care
During the winter, your planter box may need extra attention. If you live in a region with freezing temperatures, consider bringing potted plants indoors.
If that’s not an option, wrap your planter boxes with burlap or bubble wrap to provide insulation.
lso, ensure there’s adequate drainage to prevent water from freezing in the soil.
Seasonal Planting
The types of plants you include in your planter box can vary with the seasons. Here’s a quick guide to seasonal planting:
- Spring: Plant cool-season crops like lettuce and pansies.
- Summer: Opt for heat-lovers like tomatoes, peppers, and marigolds.
- Fall: Add hardy plants like kale and chrysanthemums.
- Winter: Consider planting winter greens or ornamental plants for visual interest.
Water with Care
Watering is critical to your plants’ success. A good rule of thumb is to provide about an inch of water each week. During dry spells, ensure you check on your planter box more frequently.
Deep watering once a week is better than shallow watering daily because it encourages roots to grow deeper.
Mulching Benefits
Applying mulch can greatly enhance soil moisture retention, suppress weeds, and provide an appealing appearance.
Organic mulches, such as shredded bark or straw, also improve the soil as they decompose.
Make sure to keep the mulch layer about 2-3 inches thick around your plants.
Seasonal Rotations
If your planter box is used for vegetables, consider crop rotation each season. This practice helps prevent soil depletion and reduces the likelihood of pest and disease build-up.
Rotate different plant families each year to keep soil nutrients balanced.
Use Quality Materials
Selecting high-quality materials for your planter box is vital for longevity and plant health. Using untreated wood or rot-resistant options, like cedar or redwood, is advisable.
These materials endure the elements better and reduce the risk of chemical leaching into your soil.
By following these maintenance tips, you can ensure your DIY planter boxes remain a beautiful, thriving part of your garden throughout the seasons.
For more detailed guides and resources, you can visit Gardeners.com or explore Gardening Know How. Happy gardening!
Conclusion
Creating your own DIY planter box can be a rewarding experience that adds beauty to your garden and enhances your outdoor space.
With the nine unique design ideas explored, you can choose a style that reflects your personality and complements your home.
Regardless of your skill level, the essential tools and materials outlined ensure that everyone can get started on this wonderful project.
Following our step-by-step guide, you will not only build a stunning planter box but also gain confidence in your carpentry skills. Selecting the right plants is equally crucial, as it helps your planter box flourish and remain visually appealing year-round.
Remember to consider factors like sunlight and soil type when planning your planting strategy.
To keep your planter box thriving, regular maintenance is key. With helpful tips provided, you’ll know how to care for your plants through changing seasons, ensuring they stay healthy and vibrant.
As you embark on this DIY journey, keep in mind the joy and satisfaction that comes from nurturing your own garden.
Each season presents a new opportunity to refresh your planter box, experimenting with different plants or designs, and allowing your creativity to shine.
So grab your tools, embrace your creativity, and enjoy the process of bringing life to your outdoor space with your unique DIY planter box. Happy gardening!
Read Also: DIY Raised Garden, DIY Planter Box, DIY Chicken Houses, DIY Bonfire Pit.


